GP Document Workflow
Release Notes
Docman GP 261 - November 2025
Docman GP 259 - October 2025
Docman GP 257 - September 2025
Docman GP 255 - August 2025
Docman GP 253 - July 2025
Docman GP 251 - June 2025
Docman GP 249 - June 2025
Docman GP 247 – May 2025
Docman GP 245 – April 2025
Docman GP 241 – March 2025
Docman GP 238 – Jan 2025
Navigation
Intro and Navigation
How to Reset Your Own Password
How to Display the Docman Desktop App Toolbar
How to Activate New Partner Product
How to Add or Remove Homepage Web Links
Patient Documents
Personalisation
Administration / Reception
Filing
NHS Mail Password Maintenance
How to Capture Documents from a Folder
Rejection Codes for Electronic Documents (EDT)
How to enable Auto-Annotate
How to Add Date and Time Stamp Annotation
How to File a Document with Intellisense
How to File a Document with Filing Templates
Create a Document Review - Workflow Template
Create a Document Review - Manual
Create a Document Review - Levels (Sequential)
How to Access and Use Document Collections
How to Manage Task Completion Settings
How to Create Folder Collections
How to Delete Corrupt Documents
Scanning
Admin Tasks
Document Maintenance
Clinical
System Admin
User Maintenance
How to Create a User
How to Edit a User Profile
How to Make a User Inactive
How to check and switch User Roles
How to Add and Remove User Roles
How to Reset a User's Password
How to Create a New User Group
How to Maintain a User Group
How to Give Users Deleted Documents Notifications
Filing Maintenance
How Should Intellisense Templates Be Used for Filing Accuracy?
Maintaining Intellisense filing templates
Best Practice for a Department Intellisense Template
Best Practice for a Hospital Intellisense Template
Best Practice for a Result Intellisense Template
How to Move a Document
Restoring a deleted document
Adding a Filing folder
Managing Document Folders
Managing Filing Templates
Creating and Using Custom Annotations
Understanding the NHS Mail Folders
Setting Patient and Document Security in Docman
Task Maintenance
How to Create a Workflow Template
How to create a Workflow Template (video)
How to Use Auto Start in a Workflow Template
How to Create a Task Template
How to Set the Task Priority in a Task Template
How to Create and Use a Quick Step
How to Create and Use Views
Reporting
How to Access Reports
What Predefined Reports Are Available?
How to Create a User Activity Report
How to Create an Active Task Chart
Read2 to SNOMED Switch
Docman 7 to Docman GP Migration
What are Patient Facing Services?
What are Patient Facing Services?
Patient Visibility settings when Filing - No Review
Patient Visibility settings when Filing - Review
Setting Visibility in Workflows or Tasks
Existing documents and setting visibility - Edit Filing Details
Existing documents and setting visibility - Move
Existing documents and setting visibility - Duplicate
Share
Docman Connect
Connect Release Notes
Docman Connect 259 - October 2025
Docman Connect 261 - November 2025
Docman Connect 257 - September 2025
Docman Connect 255 - August 2025
Docman Connect 253 - July 2025
Docman Connect 251 - June 2025
Docman Connect 247 – May 2025
Docman Connect 245 - April 2025
Docman Connect 241 - March 2025
Docman Connect 238 – January 2025
Docman Connect User Guide
Connect API Codes
2 Factor Authentication
Using ‘Groups’ with Connect
Connect API Consumer Creation
Connect Password Rules
Docman Connect Retention Periods
Docman Connect Service Description
Connect Printer Drivers
Docman Connect Inbound Document Model
Referral Management System (RMS)
Docman RMS e-RS User Guide
RMS Training Material Scanning and Filing User
RMS Training Material Clinical User/Consultant
RMS Training Material Appointments/Booking Team
RMS Training Videos System Support
Step by step guide to making the desktop app visible
Configure My Apps for Reports
Forgotten your Docman password?
Technical Documents
Creating a Desktop Shortcut to Docman 10
Docman 10 API Codes
Docman 10 Accepted and Excluded File types
Docman Cloud Enabler App Deployment
Docman Desktop Application Deployment
Docman Desktop Services
Downloads Centre
Postman Configuration Tutorial
Using Docman 10 With a Proxy Server
Warranted Environment Specification (WES)
Customer Support
- All Categories
- Technical Documents
- Creating a Desktop Shortcut to Docman 10
Creating a Desktop Shortcut to Docman 10
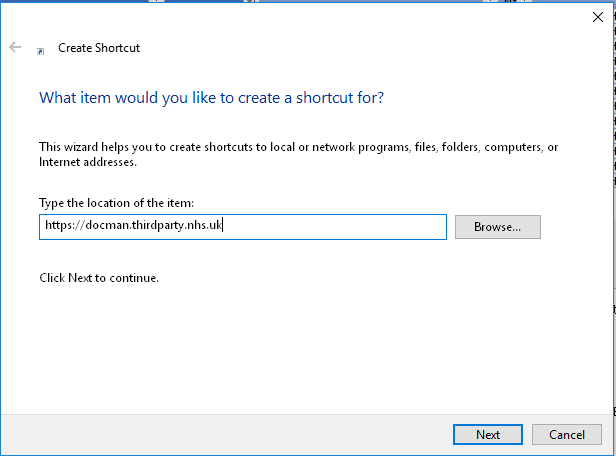
- Right Click on the desktop and click > New > Shortcut
Type https://docman.thirdparty.nhs.uk as shown below
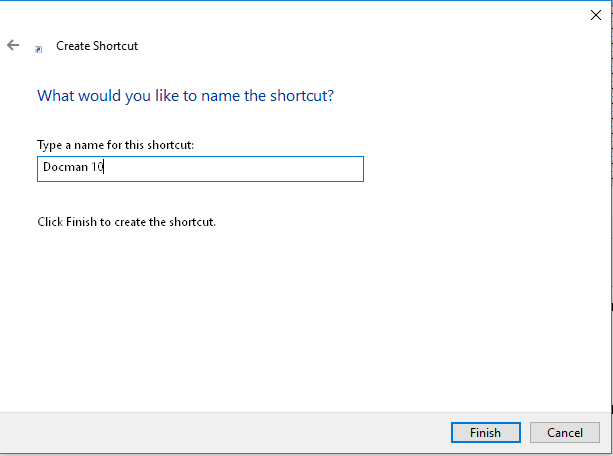
- Click Next and Name the icon “Docman 10” and then click Finish

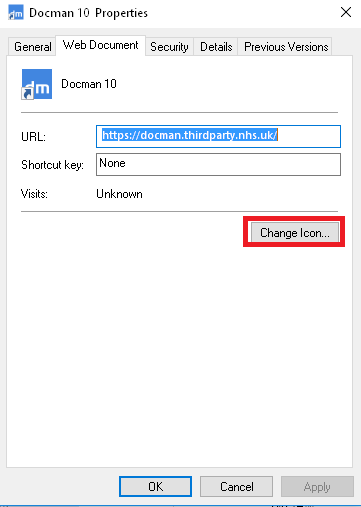
- Now find the “Docman 10” icon you have just created on your desktop and right click it and click the “Properties” option. You will see the below windows.

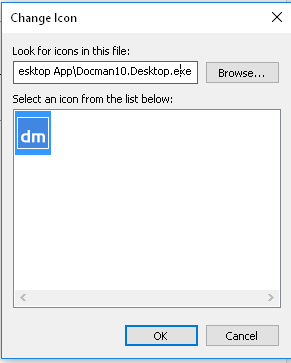
- Once the “Docman 10” icon property window is open click “Change Icon” and use one of the paths below that matches your systems architecture.
X64 Architecture
“C:\Program Files (x86)\PCTI Solutions Ltd\Docman Desktop App\Docman10.Desktop.exe”
X32 Architecture
“C:\Program Files\PCTI Solutions Ltd\Docman Desktop App\Docman10.Desktop.exe”
When you have entered the correct path for your system the icon below will become available in the “Change Icon” window as seen below.
- Click OK and then OK again in the properties window and your desktop icon will look like the icon shown below.

- Now you have the icon you can deploy it via your desired deployment system such as Group Policy or System Centre Configuration Manager.
Click here to download the icon
Updated on November 10, 2017